Hello again,
This tutorial uses Wiremod and the Laser Pointer SWEP found in the Weapons tab in your menu.
First, spawn a base prop. I prefer to use the long, blue-grey missile in the "[PHX] Useful and Explosive Props" section. Spawn 3 Wire Subtract gates anywhere on the prop. These will be your X-Y-Z chips. Make sure you remember which is which, or your prop will end up goin the wrong way. If you want, name the using the Wire Namer tool. Spawn a Laser Pointer Receiver somewhere on your prop. Get out the Vector Thruster tool. This will be the front of your missile. check bi-directional and select XYZ world in the drop-down bar. To activate the thruster, you need a Wired numpad. find one of those, and make it Toggled and the Value On 1, Value Off 0. you also need a GPS. Now, to wire it. Get out the Wire tool at the very bottom of the Wire tab.
-Wire the A of the "X","Y', and "Z" subtract chips to the "X", "Y', and "Z" inputs of the GPS, respectively.
-Wire the B of all 3 chips to the laser Pointer Receiver inputs like in the last step.
-Wire the "Mul" of the Vector Thruster to the 1 input on the Wired Numpad.
-Wire the X, Y, and Z outputs on the Vector Thruster to the X, Z and Z chips.
-Find the Laser Pointer SWEP in the Weapons section, and link it to the Laser Pointer receiver.
-Unfreeze it, (make sure you've saved it!), press 1 on your numpad, and point at whatever you want blown up!
Pictures will be added later.
Friday, March 6, 2009
Thursday, March 5, 2009
Making a basic car
This is a basic car that requires the PHX model pack.
1- Go to the "[PHX] General Construction Props" tab in your menu and spawn a PHX 4 by 2 panel. Pick it up and freeze it in midair with your physgun (the blue one).
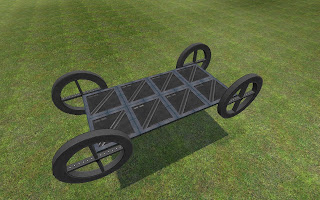
2- Choose the Wheel tool from your menu and put a wheel on each corner (like you would on a car). You can set the torque, friction or model to anything you like, but I prefer to use the APC wheel with friction 5.
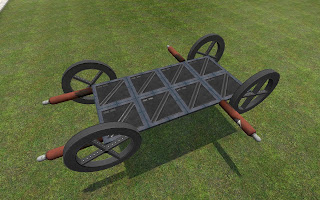
3- Get out the thruster tool. Find the red or black propane canister, set it to force 1500, and place 2 in the back (horizontally) and 1 on each side in the front. Make sure the toggle keys for the ones in the back are set to forward 8, backward 2, the one on the left is set to forward 6, backward 4, and the opposite on the right side.
4- Attach a seat of your choosing, get in, and go.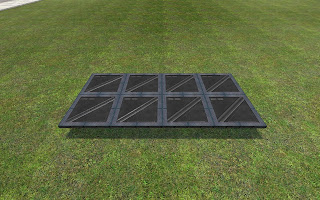
1- Go to the "[PHX] General Construction Props" tab in your menu and spawn a PHX 4 by 2 panel. Pick it up and freeze it in midair with your physgun (the blue one).
2- Choose the Wheel tool from your menu and put a wheel on each corner (like you would on a car). You can set the torque, friction or model to anything you like, but I prefer to use the APC wheel with friction 5.
3- Get out the thruster tool. Find the red or black propane canister, set it to force 1500, and place 2 in the back (horizontally) and 1 on each side in the front. Make sure the toggle keys for the ones in the back are set to forward 8, backward 2, the one on the left is set to forward 6, backward 4, and the opposite on the right side.
4- Attach a seat of your choosing, get in, and go.


Wednesday, March 4, 2009
Mods-to-get for new players:
PHX1+2+3
WireMod
Combine model pack
SG-mod
IMO, SG-mod is not very good because the weapons are overpowered, but the gates are a cool thing.
Next up, how to create a basic car (Normal and Wired).
I will add links and instructions on how to install everything later.
By the way,
I found it easier to relocate the Q menu to the Tab button and the "Show players" screen to F5, because this way, I can use the hotkeys I am used to (I use Q to switch weapons).
Public Service Announcement
This is a blog for GMod tutorials, help, and miscellaneous things related to GMod 10.
We are going to be mostly covering GM10, the one you have to pay for. The only GM9 tutorials that are going to be here are ones that are also compatible with GM10.
We are going to be mostly covering GM10, the one you have to pay for. The only GM9 tutorials that are going to be here are ones that are also compatible with GM10.
Subscribe to:
Posts (Atom)