More updates!
This time, they're about wired hoverballs. In some servers I've been in, some people wonder how I make my wired things go up or down with wired (as opposed to regular) hoverballs. Also a point of discussion is how to make thrusters bidirectional. You probably think, "I've checked the box, but I have no new outputs. Huh?". No worries, I'll explain both in this post.
First up are the hoverballs. They have two inputs, ZVelocity and Hovermode. I'm pretty sure that in the last (outdated) version of Wire, they had a third input, ZPosition, I think.
Hoverballs are pretty simple to use, but moving them is a bit harder. Hovermode is self-explanatory, and it is a 1/0 input, meaning if the value is 0, it will be off, and if the value is 1, it will be on. ZVelocity is sometimes tricky to use. I usually move wired hoverballs up and down using:
-Add gates
-Negate gates
-Advanced Pod Controllers (APC)[Optional]
The method of linking them up is this:
1) Wire the A of the Negate to the Adv. Pod input of the button you want it to go down with. If you're not using an APC, make sure that the value is positive. It doesn't necessarily have to be 1.
2) Wire the A of the add to the Adv. Pod input of the button you want it to go up with. Same as above.
3) Wire the B of the add to the Negate gate.
4) Wire the ZVelocity of any hoverballs you wish to control to the Add gate.
Quick explanation:
When you press the button that triggers the Negate gate, the ZVelocity registers it as a -1 through the add gate, and the hoverball knows that it needs to go down. When you press the button that triggers the Add gate, the opposite thing happens. If you press both buttons, nothing will happen because the values cancel each other out (-1+1=0).
If you still have a version of Wire that has the third input, ZPosition, the routine is basically the same, except for the fact that you need to add an accumulator chip (Gate-Time). Wire the hoverballs to the accumulator and the accumulator to the add gate.
On to Thrusters:
If you want one thruster to go backwards and forwards instead of 2 doing the same thing, read on.
This routine is basically the same as for the hoverballs. You need:
-1 Add gate
-1 Negate gate
-1 thruster
-An APC (Pod Controller)[Optional]
1) Wire the A of the Add gate to the value which should make it go forward, and the B to the Negate gate.
2) Wire the Negate to the value which should make it go backward.
3) Wire the thruster to the Add gate.
You're all set! Unfortunately, sometimes if you use 1 thruster instead of 2, you might get some deviation from the path that you wanted to take. This can be solved by using 2 thrusters with the above method, one at the (front/left/top) and one at the (back/right/bottom).
As always, if you have any questions or comments, please don't hesitate to email me.
Showing posts with label Tutorial. Show all posts
Showing posts with label Tutorial. Show all posts
Tuesday, November 17, 2009


Wednesday, September 30, 2009
Prop spawners, wheels, and hydraulics explained
Okay, I've seen in the search results that some of you are looking on how to use prop spawners, while others are trying to make bi-directional wired wheels. Both are actually pretty simple:
Prop spawners (wired):
During the week, I don't usually have access to GMod, so I might make a few mistakes, but here is what I remember:
-Prop spawners have a variable spawn rate, and this is set when you make one. A higher number means it spawns slower, while a lower one makes it spawn faster. This is caused by the spawn "delay". The delay is how many seconds it takes for it to refresh and spawn a new prop.
-One of the two inputs is spawn. Kinda self explanatory, when the value is greater than zero (0), it will spawn a prop.
-The other input is Undo. This is also self explanatory, it removes the props so you don't have to furiously mash your Backspace (or whatever your Undo key is) key and risk deleting something else.
Wired wheels:
To make a wired wheel go both ways, you simply have to make it have a negative input for one way and a positive for the other. I usually do it like this:
-Spawn an Add gate, a Negate gate, and a wheel.
-Wire the A of the add to the button/whatever makes it go forward.
-Wire the A of the Negate to the thing that makes it go backward.
-Wire the B of the Add to the Negate.
-Wire the Wheel to the Add.
Done, simple as that. You can also use this method for thrusters or even hoverballs (ZVelocity to the add).
Hydraulics:
Hydraulics are fairly simple once you get the hang of them. Fixed hydraulics can be used as sliders or to constrain a prop to move only in one direction.
To smooth/slow hydraulics down, you just need a Smooth gate (Gate - Time) and a constant value. Wire the A of the Smooth to the value that you would normally wire the Length of the hydraulic to, and wire the Rate to the Constant Value. The higher the Constant Value is, the more it gets 'smoothed', and the slower it is. Good for doors which are supposed to close slowly instead of chopping people in half, as has happened to me many of times...
I'll occasionally see what people are having problems with, and I'll try to make more of these in the future. If you have any questions/suggestions, Email me at Narcotic.Clown@Gmail.com.
Prop spawners (wired):
During the week, I don't usually have access to GMod, so I might make a few mistakes, but here is what I remember:
-Prop spawners have a variable spawn rate, and this is set when you make one. A higher number means it spawns slower, while a lower one makes it spawn faster. This is caused by the spawn "delay". The delay is how many seconds it takes for it to refresh and spawn a new prop.
-One of the two inputs is spawn. Kinda self explanatory, when the value is greater than zero (0), it will spawn a prop.
-The other input is Undo. This is also self explanatory, it removes the props so you don't have to furiously mash your Backspace (or whatever your Undo key is) key and risk deleting something else.
Wired wheels:
To make a wired wheel go both ways, you simply have to make it have a negative input for one way and a positive for the other. I usually do it like this:
-Spawn an Add gate, a Negate gate, and a wheel.
-Wire the A of the add to the button/whatever makes it go forward.
-Wire the A of the Negate to the thing that makes it go backward.
-Wire the B of the Add to the Negate.
-Wire the Wheel to the Add.
Done, simple as that. You can also use this method for thrusters or even hoverballs (ZVelocity to the add).
Hydraulics:
Hydraulics are fairly simple once you get the hang of them. Fixed hydraulics can be used as sliders or to constrain a prop to move only in one direction.
To smooth/slow hydraulics down, you just need a Smooth gate (Gate - Time) and a constant value. Wire the A of the Smooth to the value that you would normally wire the Length of the hydraulic to, and wire the Rate to the Constant Value. The higher the Constant Value is, the more it gets 'smoothed', and the slower it is. Good for doors which are supposed to close slowly instead of chopping people in half, as has happened to me many of times...
I'll occasionally see what people are having problems with, and I'll try to make more of these in the future. If you have any questions/suggestions, Email me at Narcotic.Clown@Gmail.com.
Sunday, September 27, 2009
Wired Elevator
Instead of making stairs, it's usually more compact and simpler to make an elevator.
You need (minimum):
2 panels (base plate and lift plate)
2 wired buttons (Off value 0, on value 1; off value 0, on value -1)(not toggled)
Accumulator (can be found in Gates - Time)
Add gate (Gates - Arithmetic)
Multiply gate (Gates - Arithmetic)
Constant Value
Wired Hydraulic (fixed)
Good to have:
Another prop welded to the lift plate with the buttons on it
Buttons at each level
Construction:
-Put your base plate where you want it and stack it if you have the stacker tool. If not, or if the props are different, position your lift plate very carefully above the base plate. Do not weld the two plates.
-Make a wired hydraulic in the center of the two plates, and put the controller where you want
-Place all the gates and the constant value close to each other near the hydraulics controller (in a square or at least on the same panel).
-Weld the second plate to the list plate if you made one, and put the buttons on there.
Wiring:
-Wire the A of the Add gate to the button with value 1
-Wire the B of the Add gate to the button with value -1
-Wire the Accumulator to the Add gate
-Wire the A of the Multiply gate to the Accumulator
-Wire the B of the Multiply gate to the constant value
-Wire the Length on the hydraulics controller to the Multiply gate
Explanation:
The buttons are the up-down controls of the elevator. The accumulator takes the values of the buttons and stores them (1 for up, -1 for down). The Multiply gate takes the value of the accumulator and makes it X times bigger, X being the constant value's number. Without the multiply gate, your elevator would go extremely slow (the default rate is 1 value per second). The hydraulics make the whole thing go up or down. If the hydraulics weren't fixed, then the elevator would just flop around instead of going in the direction you want it to. If you wanted to make the hydraulics on top instead of on bottom, then it's sometimes better to uncheck the fixed box to make gravity the only force acting on your elevator.
Tips:
-For realism, add a pole to the bottom of your lift plate and nocollide it with everything around it and the world geometry (more on that later).
-Use the Keep Upright tool on the lift and base plates for stability.
-Make a little cage for the player so he doesn't accidentally fall out while riding the elevator.
-The Constant Value can be any number you want. The higher it is, the faster the elevator goes. The number usually depends on the size/functionality of your elevator or on your mood. If it's a cargo elevator or a two-stop elevator, make it a low number (50 is usually good). If it's a personal elevator or there are great distances between stops, make it a higher number (150-250).
-Make buttons at every stop so you don't have to drag your elevator and risk breaking it.
I will post a few pictures of an elevator I made on Flatgrass while we were killing zombies. It has a nice look to it, and I might post it as an advanced duplication (adv. dupe) on www.garrysmod.org.
You need (minimum):
2 panels (base plate and lift plate)
2 wired buttons (Off value 0, on value 1; off value 0, on value -1)(not toggled)
Accumulator (can be found in Gates - Time)
Add gate (Gates - Arithmetic)
Multiply gate (Gates - Arithmetic)
Constant Value
Wired Hydraulic (fixed)
Good to have:
Another prop welded to the lift plate with the buttons on it
Buttons at each level
Construction:
-Put your base plate where you want it and stack it if you have the stacker tool. If not, or if the props are different, position your lift plate very carefully above the base plate. Do not weld the two plates.
-Make a wired hydraulic in the center of the two plates, and put the controller where you want
-Place all the gates and the constant value close to each other near the hydraulics controller (in a square or at least on the same panel).
-Weld the second plate to the list plate if you made one, and put the buttons on there.
Wiring:
-Wire the A of the Add gate to the button with value 1
-Wire the B of the Add gate to the button with value -1
-Wire the Accumulator to the Add gate
-Wire the A of the Multiply gate to the Accumulator
-Wire the B of the Multiply gate to the constant value
-Wire the Length on the hydraulics controller to the Multiply gate
Explanation:
The buttons are the up-down controls of the elevator. The accumulator takes the values of the buttons and stores them (1 for up, -1 for down). The Multiply gate takes the value of the accumulator and makes it X times bigger, X being the constant value's number. Without the multiply gate, your elevator would go extremely slow (the default rate is 1 value per second). The hydraulics make the whole thing go up or down. If the hydraulics weren't fixed, then the elevator would just flop around instead of going in the direction you want it to. If you wanted to make the hydraulics on top instead of on bottom, then it's sometimes better to uncheck the fixed box to make gravity the only force acting on your elevator.
Tips:
-For realism, add a pole to the bottom of your lift plate and nocollide it with everything around it and the world geometry (more on that later).
-Use the Keep Upright tool on the lift and base plates for stability.
-Make a little cage for the player so he doesn't accidentally fall out while riding the elevator.
-The Constant Value can be any number you want. The higher it is, the faster the elevator goes. The number usually depends on the size/functionality of your elevator or on your mood. If it's a cargo elevator or a two-stop elevator, make it a low number (50 is usually good). If it's a personal elevator or there are great distances between stops, make it a higher number (150-250).
-Make buttons at every stop so you don't have to drag your elevator and risk breaking it.
I will post a few pictures of an elevator I made on Flatgrass while we were killing zombies. It has a nice look to it, and I might post it as an advanced duplication (adv. dupe) on www.garrysmod.org.
Friday, March 6, 2009
Making a basic Laser-Guided missile
Hello again,
This tutorial uses Wiremod and the Laser Pointer SWEP found in the Weapons tab in your menu.
First, spawn a base prop. I prefer to use the long, blue-grey missile in the "[PHX] Useful and Explosive Props" section. Spawn 3 Wire Subtract gates anywhere on the prop. These will be your X-Y-Z chips. Make sure you remember which is which, or your prop will end up goin the wrong way. If you want, name the using the Wire Namer tool. Spawn a Laser Pointer Receiver somewhere on your prop. Get out the Vector Thruster tool. This will be the front of your missile. check bi-directional and select XYZ world in the drop-down bar. To activate the thruster, you need a Wired numpad. find one of those, and make it Toggled and the Value On 1, Value Off 0. you also need a GPS. Now, to wire it. Get out the Wire tool at the very bottom of the Wire tab.
-Wire the A of the "X","Y', and "Z" subtract chips to the "X", "Y', and "Z" inputs of the GPS, respectively.
-Wire the B of all 3 chips to the laser Pointer Receiver inputs like in the last step.
-Wire the "Mul" of the Vector Thruster to the 1 input on the Wired Numpad.
-Wire the X, Y, and Z outputs on the Vector Thruster to the X, Z and Z chips.
-Find the Laser Pointer SWEP in the Weapons section, and link it to the Laser Pointer receiver.
-Unfreeze it, (make sure you've saved it!), press 1 on your numpad, and point at whatever you want blown up!
Pictures will be added later.
This tutorial uses Wiremod and the Laser Pointer SWEP found in the Weapons tab in your menu.
First, spawn a base prop. I prefer to use the long, blue-grey missile in the "[PHX] Useful and Explosive Props" section. Spawn 3 Wire Subtract gates anywhere on the prop. These will be your X-Y-Z chips. Make sure you remember which is which, or your prop will end up goin the wrong way. If you want, name the using the Wire Namer tool. Spawn a Laser Pointer Receiver somewhere on your prop. Get out the Vector Thruster tool. This will be the front of your missile. check bi-directional and select XYZ world in the drop-down bar. To activate the thruster, you need a Wired numpad. find one of those, and make it Toggled and the Value On 1, Value Off 0. you also need a GPS. Now, to wire it. Get out the Wire tool at the very bottom of the Wire tab.
-Wire the A of the "X","Y', and "Z" subtract chips to the "X", "Y', and "Z" inputs of the GPS, respectively.
-Wire the B of all 3 chips to the laser Pointer Receiver inputs like in the last step.
-Wire the "Mul" of the Vector Thruster to the 1 input on the Wired Numpad.
-Wire the X, Y, and Z outputs on the Vector Thruster to the X, Z and Z chips.
-Find the Laser Pointer SWEP in the Weapons section, and link it to the Laser Pointer receiver.
-Unfreeze it, (make sure you've saved it!), press 1 on your numpad, and point at whatever you want blown up!
Pictures will be added later.
Thursday, March 5, 2009
Making a basic car
This is a basic car that requires the PHX model pack.
1- Go to the "[PHX] General Construction Props" tab in your menu and spawn a PHX 4 by 2 panel. Pick it up and freeze it in midair with your physgun (the blue one).
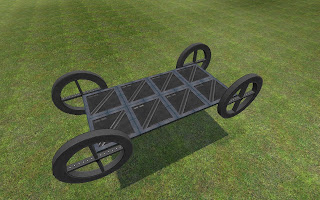
2- Choose the Wheel tool from your menu and put a wheel on each corner (like you would on a car). You can set the torque, friction or model to anything you like, but I prefer to use the APC wheel with friction 5.
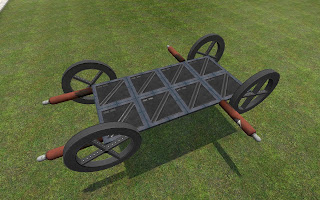
3- Get out the thruster tool. Find the red or black propane canister, set it to force 1500, and place 2 in the back (horizontally) and 1 on each side in the front. Make sure the toggle keys for the ones in the back are set to forward 8, backward 2, the one on the left is set to forward 6, backward 4, and the opposite on the right side.
4- Attach a seat of your choosing, get in, and go.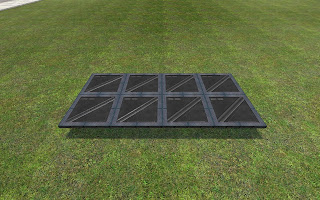
1- Go to the "[PHX] General Construction Props" tab in your menu and spawn a PHX 4 by 2 panel. Pick it up and freeze it in midair with your physgun (the blue one).
2- Choose the Wheel tool from your menu and put a wheel on each corner (like you would on a car). You can set the torque, friction or model to anything you like, but I prefer to use the APC wheel with friction 5.
3- Get out the thruster tool. Find the red or black propane canister, set it to force 1500, and place 2 in the back (horizontally) and 1 on each side in the front. Make sure the toggle keys for the ones in the back are set to forward 8, backward 2, the one on the left is set to forward 6, backward 4, and the opposite on the right side.
4- Attach a seat of your choosing, get in, and go.


Subscribe to:
Posts (Atom)
